【Three.js】走进3D的奇妙世界(学习打卡02)
正式学习几何体,了解3D网格几何体组成原理
首先需要明确,我们看到的3维模型都是中空的,基本都只是闭合的表面,这一点从“网格体”的名字也能看出。
从存储的角度看,网格体只是由一个个顶点组成,既没有“面”也没有“体”:因为平面可以由3个点来确定,立体可以由闭合的面确定,不用额外存储信息,以此达到压缩最大化的目的。所以3维网格体看上去是由若干个三角形组成,存储时都是一些点而已。一个完整的网格体(mesh)可以由一系列基本的几何信息描述。
掌握几何体顶点UV法向属性
- https://www.bilibili.com/video/BV1Gg411X7FY?p=17
- BoxGeometry(立方缓冲几何体):http://localhost:8080/docs/?q=box#api/zh/geometries/BoxGeometry
- BufferGeometry:http://localhost:8080/docs/?q=box#api/zh/core/BufferGeometry
- 对于三角网格,如果能把它与参数平面建立一一映射,那么它也就被参数化了,这个映射就是
UV展开
1 | // 几何体 |
1 | BoxGeometry { |
1 | Mesh { |
01 BufferGeometry设置顶点创建矩形
- 根据六个顶点坐标,创建两个三角形拼成的一个矩形面:
1
2
3
4
5
6
7
8
9
10
11
12
13
14
15
16
17
18
19
20
21
22// (1) 创建几何体
const geometry = new THREE.BufferGeometry() // 面片、线或点几何体
// 顶点数组(一维数组)
const vertices = new Float32Array([
-1.0, -1.0, 1.0,
1.0, -1.0, 1.0,
1.0, 1.0, 1.0,
1.0, 1.0, 1.0,
-1.0, 1.0, 1.0,
-1.0, -1.0, 1.0
])
// 把顶点设置到geometry的属性上(每三个值作为一个坐标)
geometry.setAttribute('position', new THREE.BufferAttribute(vertices, 3))
// (2) 创建材质
const material = new THREE.MeshBasicMaterial({ color: 0xffff00 })
// (3) 根据几何体和材质创建对象
const mesh = new THREE.Mesh(geometry, material)
// 将几何体对象添加到场景中
console.log(mesh)
this.scene.add(mesh)
完整Vue代码:
1 | <template> |
02 生成酷炫三角形科技物体
使用Buffer缓冲区这个几何体来实现自定义物体
1 | <template> |
可以设置材质和透明度:
1
2
3
4
5
6
7
8
9
10
11
12
13
14
15
16
17
18
19
20
21
22
23
24
25// 3、创建物体对象
// (1) 创建几何体
for (let i = 0; i < 50; i++) {
const geometry = new THREE.BufferGeometry() // 创建三角形面(.BufferGeometry表示面片、线或点几何体)
const positionArray = new Float32Array(9) // 设置顶点位置数组
// 每个三角形需要3个顶点,每个顶点需要3个值
for (let j = 0; j < 9; j++) {
positionArray[j] = Math.random() * 5
}
// 把顶点设置到geometry的属性上(每三个值作为一个坐标)
geometry.setAttribute('position', new THREE.BufferAttribute(positionArray, 3))
// (2) 创建材质
const color = new THREE.Color(Math.random(), Math.random(), Math.random())
const material = new THREE.MeshBasicMaterial({
color: color,
transparent: true,
opacity: 0.5 // 透明度
})
// (3) 根据几何体和材质创建对象
const mesh = new THREE.Mesh(geometry, material)
// 将几何体对象添加到场景中
console.log(mesh)
this.scene.add(mesh)
}坐标跨度可以设置成
[-5, 5]1
2
3
4// 每个三角形需要3个顶点,每个顶点需要3个值
for (let j = 0; j < 9; j++) {
positionArray[j] = Math.random() * 10 - 5
}
03 常用网格几何体
04 初识材质和纹理
首先创建一个最简单的立方体:
1
2
3
4
5
6
7
8
9
10
11
12
13
14
15
16
17
18
19
20
21
22
23
24
25
26
27
28
29
30
31
32
33
34
35
36
37
38
39
40
41
42
43
44
45
46
47
48
49
50
51
52
53
54
55
56
57
58
59
60
61
62
63
64
65
66
67
68
69
70
71
72
73
74
75
76
77
78
79
80
81
82
83
84
85
86
87
88
89
90
91
92
93
94
95
96
97<template>
<div></div>
</template>
<script>
// 04 初识材质和纹理
import * as THREE from 'three'
// 导入轨道控制器
import { OrbitControls } from 'three/examples/jsm/controls/OrbitControls'
export default {
data() {
return {
scene: null, // 场景
camera: null, // 摄像机
cubeGeometry: null, // 几何体
basicMaterial: null, // 基础网格材质
cube: null, // 立方体
renderer: null, // 渲染器
controls: null // 轨道控制器
}
},
methods: {
init() {
// 1、创建场景对象
this.scene = new THREE.Scene()
// 2、创建摄像机
this.camera = new THREE.PerspectiveCamera(
75, // 摄像机视锥体垂直视野角度
window.innerWidth / window.innerHeight, // 摄像机视锥体长宽比
0.1, // 摄像机视锥体近端面
1000 // 摄像机视锥体远端面
)
this.camera.position.set(0, 0, 10) // 设置摄像机位置坐标
this.scene.add(this.camera) // 将摄像机添加到场景中
// 3、创建物体对象
this.cubeGeometry = new THREE.BoxBufferGeometry(1, 1, 1) // 几何体
this.basicMaterial = new THREE.MeshBasicMaterial({
color: '#ffff00'
}) // 基础网格材质
this.cube = new THREE.Mesh(this.cubeGeometry, this.basicMaterial)
this.scene.add(this.cube)
// 4、初始化渲染器
this.renderer = new THREE.WebGLRenderer()
// 设置渲染的尺寸大小
this.renderer.setSize(window.innerWidth, window.innerHeight)
// console.log(this.renderer) // 渲染器渲染出的canvas画布
// 将WebGL渲染的内容canvas添加到body
document.body.appendChild(this.renderer.domElement)
// 创建轨道控制器
this.controls = new OrbitControls(this.camera, this.renderer.domElement)
// 设置控制器阻尼,让其更有真实效果
this.controls.enableDamping = true
// 添加坐标轴辅助器
const axesHelper = new THREE.AxesHelper(5)
this.scene.add(axesHelper) // 添加到场景中
},
// 重绘渲染函数
render() {
// 控制器阻尼的调用函数
this.controls.update()
// 使用渲染器,通过相机将场景渲染进来
this.renderer.render(this.scene, this.camera)
// 请求动画帧,渲染下一帧的时候就会调用render函数,也就是回调自身
requestAnimationFrame(this.render)
}
},
mounted() {
this.init()
this.render()
// 监听画面变化,更新渲染画面
window.addEventListener('resize', () => {
// console.log('画面变化了')
// 更新摄像头(宽高比)
this.camera.aspect = window.innerWidth / window.innerHeight
// 更新摄像机的投影矩阵
this.camera.updateProjectionMatrix()
// 更新渲染器
this.renderer.setSize(window.innerWidth, window.innerHeight)
// 设置渲染器的像素比(让其等于设备的像素比)
this.renderer.setPixelRatio(window.deviceRixelRatio)
})
}
}
</script>
<style lang="less" scoped>
</style>在创建摄像机之后,创建物体之前,导入纹理加载器:
1
2
3
4
5
6
7
8
9
10
11
12
13
14
15
16
17
18
19
20
21
22
23
24
25
26
27
28
29
30
31
32
33
34
35
36
37
38
39
40
41
42
43
44
45
46
47
48
49
50
51
52
53
54
55
56
57
58
59
60
61
62
63
64
65
66
67
68
69
70
71
72
73
74
75
76
77
78
79
80
81
82
83
84
85
86
87
88
89
90
91
92
93
94
95
96
97
98
99
100
101
102
103
104<template>
<div></div>
</template>
<script>
// 04 初识材质和纹理
import * as THREE from 'three'
// 导入轨道控制器
import { OrbitControls } from 'three/examples/jsm/controls/OrbitControls'
export default {
data() {
return {
scene: null, // 场景
camera: null, // 摄像机
textureLoader: null, // 纹理加载器
cubeGeometry: null, // 几何体
basicMaterial: null, // 基础网格材质
cube: null, // 立方体
renderer: null, // 渲染器
controls: null // 轨道控制器
}
},
methods: {
init() {
// 1、创建场景对象
this.scene = new THREE.Scene()
// 2、创建摄像机
this.camera = new THREE.PerspectiveCamera(
75, // 摄像机视锥体垂直视野角度
window.innerWidth / window.innerHeight, // 摄像机视锥体长宽比
0.1, // 摄像机视锥体近端面
1000 // 摄像机视锥体远端面
)
this.camera.position.set(0, 0, 10) // 设置摄像机位置坐标
this.scene.add(this.camera) // 将摄像机添加到场景中
// 导入纹理加载器
this.textureLoader = new THREE.TextureLoader()
const doorColorTexture = this.textureLoader.load(require('./assets/textures/door/color.jpg'))
// 3、创建物体对象
this.cubeGeometry = new THREE.BoxBufferGeometry(1, 1, 1) // 几何体
// 材质
this.basicMaterial = new THREE.MeshBasicMaterial({
color: '#ffff00',
map: doorColorTexture
})
this.cube = new THREE.Mesh(this.cubeGeometry, this.basicMaterial)
this.scene.add(this.cube)
// 4、初始化渲染器
this.renderer = new THREE.WebGLRenderer()
// 设置渲染的尺寸大小
this.renderer.setSize(window.innerWidth, window.innerHeight)
// console.log(this.renderer) // 渲染器渲染出的canvas画布
// 将WebGL渲染的内容canvas添加到body
document.body.appendChild(this.renderer.domElement)
// 创建轨道控制器
this.controls = new OrbitControls(this.camera, this.renderer.domElement)
// 设置控制器阻尼,让其更有真实效果
this.controls.enableDamping = true
// 添加坐标轴辅助器
const axesHelper = new THREE.AxesHelper(5)
this.scene.add(axesHelper) // 添加到场景中
},
// 重绘渲染函数
render() {
// 控制器阻尼的调用函数
this.controls.update()
// 使用渲染器,通过相机将场景渲染进来
this.renderer.render(this.scene, this.camera)
// 请求动画帧,渲染下一帧的时候就会调用render函数,也就是回调自身
requestAnimationFrame(this.render)
}
},
mounted() {
this.init()
this.render()
// 监听画面变化,更新渲染画面
window.addEventListener('resize', () => {
// console.log('画面变化了')
// 更新摄像头(宽高比)
this.camera.aspect = window.innerWidth / window.innerHeight
// 更新摄像机的投影矩阵
this.camera.updateProjectionMatrix()
// 更新渲染器
this.renderer.setSize(window.innerWidth, window.innerHeight)
// 设置渲染器的像素比(让其等于设备的像素比)
this.renderer.setPixelRatio(window.deviceRixelRatio)
})
}
}
</script>
<style lang="less" scoped>
</style>注意在Vue2中导入图片的写法和相对路径
05 纹理常用属性(偏移-旋转-重复)
纹理加载器TextureLoader:https://threejs.org/docs/index.html?q=text#api/zh/loaders/TextureLoader
纹理Texture:https://threejs.org/docs/index.html?q=text#api/zh/textures/Texture
设置纹理的偏移
1
2
3
4
5
6
7
8
9// 导入纹理加载器
this.textureLoader = new THREE.TextureLoader()
const doorColorTexture = this.textureLoader.load(require('./assets/textures/door/color.jpg'))
// console.log(doorColorTexture)
// 设置纹理的偏移
// doorColorTexture.offset.x = 0.5
// doorColorTexture.offset.y = 0.5
doorColorTexture.offset.set(0.5, 0.5)设置纹理的旋转
1
2// 设置纹理的旋转
doorColorTexture.rotation = Math.PI / 4 // 旋转45deg可以更改旋转中心点,默认是左下角
(0, 0),纹理的正中心对应(0.5, 0.5)。1
2
3// 设置纹理的旋转
doorColorTexture.center.set(0.5, 0.5) // 设置旋转的原点
doorColorTexture.rotation = Math.PI / 4 // 旋转45deg设置纹理的重复
1
2// 设置纹理的重复
doorColorTexture.repeat.set(2, 3) // 水平重复2次,竖直重复3次效果不明显,需要设置.wrapS和.wrapT来定义纹理贴图在水平方向上和竖直方向上将如何包裹:
1
2
3
4// 设置纹理的重复
doorColorTexture.repeat.set(2, 3) // 水平重复2次,竖直重复3次
doorColorTexture.wrapS = THREE.MirroredRepeatWrapping // 设置纹理重复的模式(竖直无限重复)
doorColorTexture.wrapT = THREE.RepeatWrapping // 设置纹理重复的模式(水平镜像重复)
完整Vue代码:
1 | <template> |
06 纹理显示算法与mipmap
Texture.magFilter:https://threejs.org/docs/index.html?q=text#api/zh/textures/Texture.magFilterTexture.minFilter:https://threejs.org/docs/index.html?q=text#api/zh/textures/Texture.minFilter- 纹理常量(Texture Constants):https://threejs.org/docs/index.html?q=text#api/zh/constants/Textures
1 | // 导入纹理加载器 |
完整Vue代码:
1 | <template> |
07 透明材质与透明纹理
MeshBasicMaterial.alphaMap:https://threejs.org/docs/index.html?q=mes#api/zh/materials/MeshBasicMaterial.alphaMapMaterial.transparent:https://threejs.org/docs/index.html?q=mes#api/zh/materials/Material.transparent定义此材质是否透明,使用alpha贴图(一张灰度纹理)控制整个表面的不透明度
1
2
3
4
5
6
7
8
9
10
11
12
13
14
15
16// 导入纹理加载器
this.textureLoader = new THREE.TextureLoader()
const doorColorTexture = this.textureLoader.load(require('./assets/textures/door/color.jpg'))
const dooralphaTexture = this.textureLoader.load(require('./assets/textures/door/alpha.jpg'))
// 3、创建物体对象
this.cubeGeometry = new THREE.BoxBufferGeometry(1, 1, 1) // 几何体
// 材质
this.basicMaterial = new THREE.MeshBasicMaterial({
color: '#ffff00',
map: doorColorTexture,
alphaMap: dooralphaTexture,
transparent: true
})
this.cube = new THREE.Mesh(this.cubeGeometry, this.basicMaterial)
this.scene.add(this.cube)Material.opacity:https://threejs.org/docs/index.html?q=mes#api/zh/materials/Material.opacityMaterial.side:https://threejs.org/docs/index.html?q=mes#api/zh/materials/Material.side设置材质透明度,以及定义将要渲染哪一面
1
2
3
4
5
6
7
8
9
10
11
12
13
14
15
16
17
18
19
20
21
22// 3、创建物体对象
this.cubeGeometry = new THREE.BoxBufferGeometry(1, 1, 1) // 几何体
// 材质
this.basicMaterial = new THREE.MeshBasicMaterial({
color: '#ffff00',
map: doorColorTexture,
alphaMap: dooralphaTexture,
transparent: true,
opacity: 1,
side: THREE.DoubleSide
})
// this.basicMaterial.side = THREE.DoubleSide // 也可以在材质对象构建完之后设置
this.cube = new THREE.Mesh(this.cubeGeometry, this.basicMaterial)
this.scene.add(this.cube)
// 添加平面
const plane = new THREE.Mesh(
new THREE.PlaneBufferGeometry(1, 1),
this.basicMaterial
)
plane.position.set(3, 0, 0)
this.scene.add(plane) // 添加到场景中
完整Vue代码:
1 | <template> |
08 环境遮挡贴图与强度
MeshBasicMaterial.aoMap(需要第二组UV):https://threejs.org/docs/index.html?q=mes#api/zh/materials/MeshBasicMaterial.aoMapMeshBasicMaterial.aoMapIntensity:https://threejs.org/docs/index.html?q=BufferGeometry#api/zh/materials/MeshBasicMaterial.aoMapIntensity
目前的理解是相当于在材质外面贴一层假阴影
- 添加环境遮挡贴图,设置环境遮挡效果的强度
1
2
3
4
5
6
7
8
9
10
11
12
13
14
15
16
17
18
19
20
21
22
23
24
25
26
27
28
29
30
31
32
33
34
35
36
37
38
39
40
41
42// 导入纹理加载器
this.textureLoader = new THREE.TextureLoader()
const doorColorTexture = this.textureLoader.load(require('./assets/textures/door/color.jpg'))
const dooralphaTexture = this.textureLoader.load(require('./assets/textures/door/alpha.jpg'))
const doorAoTexture = this.textureLoader.load(
require('./assets/textures/door/ambientOcclusion.jpg')
)
// 3、创建物体对象
this.cubeGeometry = new THREE.BoxBufferGeometry(1, 1, 1) // 几何体
// 材质
this.basicMaterial = new THREE.MeshBasicMaterial({
color: '#ffff00',
map: doorColorTexture,
alphaMap: dooralphaTexture,
transparent: true,
aoMap: doorAoTexture,
aoMapIntensity: 0.7,
// opacity: 1,
side: THREE.DoubleSide
})
// this.basicMaterial.side = THREE.DoubleSide // 也可以在材质对象构建完之后设置
this.cube = new THREE.Mesh(this.cubeGeometry, this.basicMaterial)
this.scene.add(this.cube)
// 给cube设置第二组UV(.aoMap需要第二组UV)
this.cubeGeometry.setAttribute(
'uv2',
new THREE.BufferAttribute(this.cubeGeometry.attributes.uv.array, 2) // 使用原来的UV数组,2个值作为一个点
)
// 添加平面
const planeGeometry = new THREE.PlaneBufferGeometry(1, 1) // 面片、线或点几何体的有效表述。包括顶点位置,面片索引、法相量、颜色值、UV 坐标和自定义缓存属性值
const plane = new THREE.Mesh(planeGeometry, this.basicMaterial)
plane.position.set(3, 0, 0)
this.scene.add(plane) // 添加到场景中
// 给平面设置第二组UV(.aoMap需要第二组UV)
planeGeometry.setAttribute(
'uv2',
new THREE.BufferAttribute(planeGeometry.attributes.uv.array, 2) // 使用原来的UV数组,2个值作为一个点
)
完整Vue代码:
1 | <template> |
09 详解PBR物理渲染
1. 什么是PBR
PBR,指的是基于物理属性的引擎渲染。
以前的渲染是在模仿灯光的外观,现在是在模仿光的实际行为,使图形看起来更真实。
2. PBR组成部分

- 灯光属性:直接照明、间接照明、直接高光、间接高光、阴影、环境光闭塞
- 表面属性:基础色、法线、高光、粗糙度、金属度

3. 灯光属性
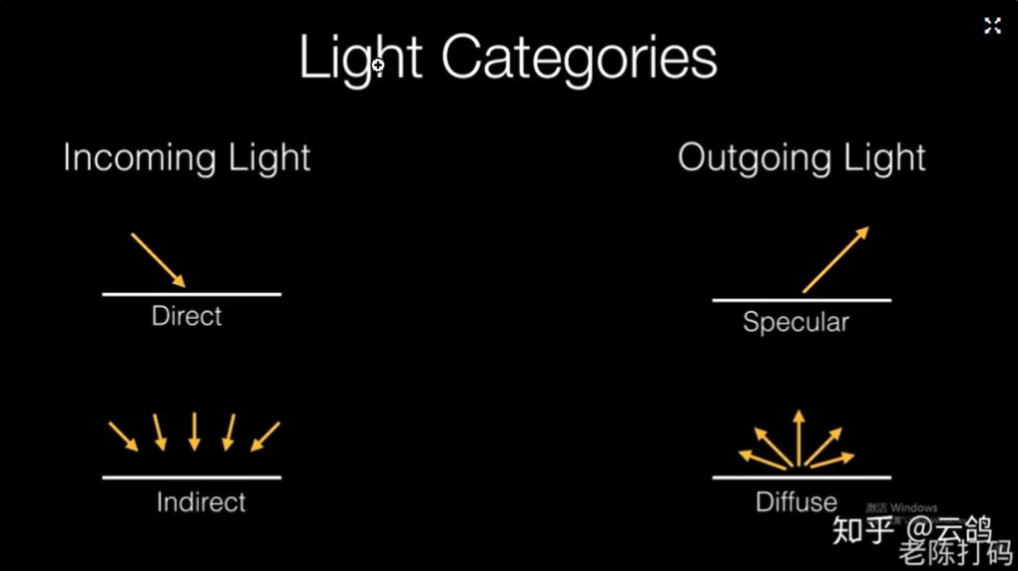
(1) 光线类型
- 入射光
- 直接照明:直接从光源发射阴影表面的光
- 间接照明:环境光和直接光经过反弹第二次进入的光
- 反射光
- 镜面光:在经过表面反射聚焦在同一方向上进入人眼的高亮光
- 漫反射:光被反射并沿着各个方向离开表面
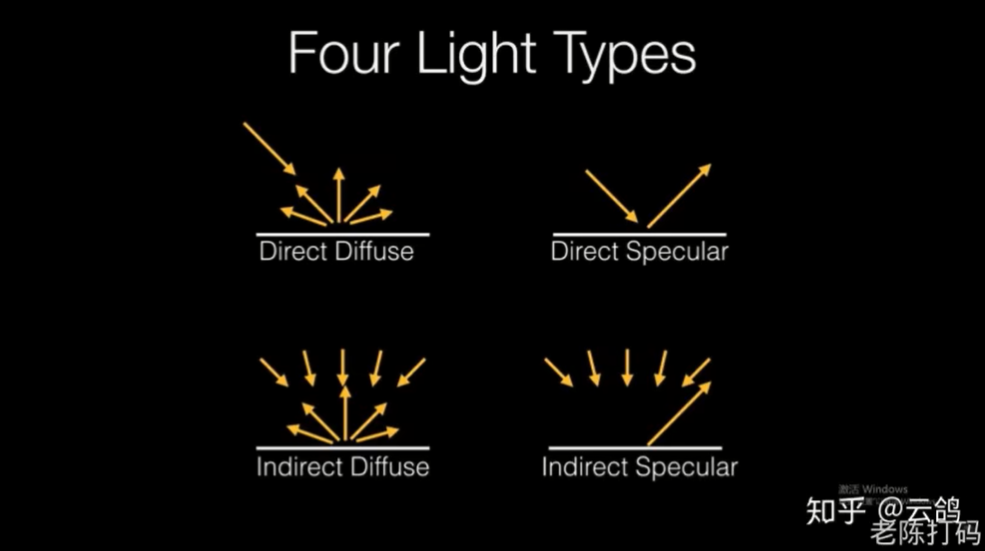
(2) 光与表面相互作用类型
- 光与表面相互作用类型
- 直接漫反射
- 直接高光
- 间接漫反射
- 间接高光(镜面反射)
4. 表面属性
- 基础色
- 法线
- 镜面
- 粗糙度
- 金属度
5. 非金属和金属对比
- 非金属
- 基础颜色 = 漫反射
- 镜面反射 = 0-8%
- 金属
- 基础颜色 = 0-100%的镜面反射
- 镜面 = 0%
- 漫反射总是黑色的
6. 总结
- PBR是基于物理渲染的着色模型,PBR着色模型分为材质和灯光两个属性
- 材质部分是由:基础色、法线、高亮、粗糙度、金属度来定义材质表面属性的
- 灯光部分是由:直接照明、间接照明、直接高光、间接高光、阴影、环境光闭塞来定义照明属性的
- 通常我们写材质的时候,只需要关注材质部分的属性即可,灯光属性都是由引擎定义好的直接使用即可。
- PBR渲染模型不但指的是PBR材质,还有灯光,两者缺一不可。
10 标准网格材质与光照物理效果
标准网格材质(MeshStandardMaterial):https://threejs.org/docs/index.html?q=meshs#api/zh/materials/MeshStandardMaterial
使用标准网格材质,由于没有灯光,贴图是黑色的
1
2
3
4
5
6
7
8
9
10
11
12
13
14
15
16
17
18
19
20
21
22
23
24
25
26
27
28
29
30
31
32
33
34
35
36
37
38
39
40
41
42// 导入纹理加载器
this.textureLoader = new THREE.TextureLoader()
const doorColorTexture = this.textureLoader.load(require('./assets/textures/door/color.jpg'))
const dooralphaTexture = this.textureLoader.load(require('./assets/textures/door/alpha.jpg'))
const doorAoTexture = this.textureLoader.load(
require('./assets/textures/door/ambientOcclusion.jpg')
)
// 3、创建物体对象
this.cubeGeometry = new THREE.BoxBufferGeometry(1, 1, 1) // 几何体
// 材质
this.material = new THREE.MeshStandardMaterial({
color: '#ffff00',
map: doorColorTexture,
alphaMap: dooralphaTexture,
transparent: true,
aoMap: doorAoTexture,
aoMapIntensity: 0.7,
// opacity: 1,
side: THREE.DoubleSide
})
// this.material.side = THREE.DoubleSide // 也可以在材质对象构建完之后设置
this.cube = new THREE.Mesh(this.cubeGeometry, this.material)
this.scene.add(this.cube)
// 给cube设置第二组UV(.aoMap需要第二组UV)
this.cubeGeometry.setAttribute(
'uv2',
new THREE.BufferAttribute(this.cubeGeometry.attributes.uv.array, 2) // 使用原来的UV数组,2个值作为一个点
)
// 添加平面
const planeGeometry = new THREE.PlaneBufferGeometry(1, 1) // 面片、线或点几何体的有效表述。包括顶点位置,面片索引、法相量、颜色值、UV 坐标和自定义缓存属性值
const plane = new THREE.Mesh(planeGeometry, this.material)
plane.position.set(3, 0, 0)
this.scene.add(plane) // 添加到场景中
// 给平面设置第二组UV(.aoMap需要第二组UV)
planeGeometry.setAttribute(
'uv2',
new THREE.BufferAttribute(planeGeometry.attributes.uv.array, 2) // 使用原来的UV数组,2个值作为一个点
)添加环境光AmbientLight:https://threejs.org/docs/index.html?q=ambi#api/zh/lights/AmbientLight
1
2
3
4// 灯光
// 环境光
const light = new THREE.AmbientLight(0xffffff) // soft white light
this.scene.add(light)可以设置强度,默认是1:
1
2
3
4// 灯光
// 环境光
const light = new THREE.AmbientLight(0xffffff, 0.5) // soft white light
this.scene.add(light)添加直线光源,平行光DirectionalLight:https://threejs.org/docs/index.html?q=light#api/zh/lights/DirectionalLight
1
2
3// 直线光源
const directionalLight = new THREE.DirectionalLight(0xffffff, 0.5)
this.scene.add(directionalLight)可以设置光源位置:
1
2
3
4
5
6
7
8// 灯光
// 环境光
const light = new THREE.AmbientLight(0xffffff, 0.5) // soft white light
this.scene.add(light)
// 直线光源
const directionalLight = new THREE.DirectionalLight(0xffffff, 0.5)
directionalLight.position.set(10, 10, 10) // 平行光位置
this.scene.add(directionalLight)
完整Vue代码:
1 | <template> |
11 置换贴图与顶点细分设置
导入置换贴图
.displacementMap:https://threejs.org/docs/index.html?q=ambi#api/zh/materials/MeshStandardMaterial.displacementMap1
2
3
4
5
6
7
8
9
10
11
12
13
14
15
16
17
18
19
20
21
22
23
24
25
26
27
28
29
30
31
32
33
34
35
36
37
38
39
40
41
42
43
44
45
46
47
48
49
50
51
52
53
54
55// 导入纹理加载器
this.textureLoader = new THREE.TextureLoader()
const doorColorTexture = this.textureLoader.load(require('./assets/textures/door/color.jpg'))
const dooralphaTexture = this.textureLoader.load(require('./assets/textures/door/alpha.jpg'))
const doorAoTexture = this.textureLoader.load(
require('./assets/textures/door/ambientOcclusion.jpg')
)
// 导入置换贴图
const doorHeightTexture = this.textureLoader.load(require('./assets/textures/door/height.jpg'))
// 3、创建物体对象
this.cubeGeometry = new THREE.BoxBufferGeometry(1, 1, 1) // 几何体
// 材质
this.material = new THREE.MeshStandardMaterial({
color: '#ffff00',
map: doorColorTexture,
alphaMap: dooralphaTexture,
transparent: true,
aoMap: doorAoTexture,
aoMapIntensity: 0.7,
displacementMap: doorHeightTexture,
// opacity: 1,
side: THREE.DoubleSide
})
// this.material.side = THREE.DoubleSide // 也可以在材质对象构建完之后设置
this.cube = new THREE.Mesh(this.cubeGeometry, this.material)
this.scene.add(this.cube)
// 给cube设置第二组UV(.aoMap需要第二组UV)
this.cubeGeometry.setAttribute(
'uv2',
new THREE.BufferAttribute(this.cubeGeometry.attributes.uv.array, 2) // 使用原来的UV数组,2个值作为一个点
)
// 添加平面
const planeGeometry = new THREE.PlaneBufferGeometry(1, 1) // 面片、线或点几何体的有效表述。包括顶点位置,面片索引、法相量、颜色值、UV 坐标和自定义缓存属性值
const plane = new THREE.Mesh(planeGeometry, this.material)
plane.position.set(2, 0, 0)
this.scene.add(plane) // 添加到场景中
// 给平面设置第二组UV(.aoMap需要第二组UV)
planeGeometry.setAttribute(
'uv2',
new THREE.BufferAttribute(planeGeometry.attributes.uv.array, 2) // 使用原来的UV数组,2个值作为一个点
)
// 灯光
// 环境光
const light = new THREE.AmbientLight(0xffffff, 0.5) // soft white light
this.scene.add(light)
// 直线光源
const directionalLight = new THREE.DirectionalLight(0xffffff, 0.5)
directionalLight.position.set(10, 10, 10) // 平行光位置
this.scene.add(directionalLight)现在还是没有凸起效果的,需要我们设置顶点,参考平面缓冲几何体(PlaneGeometry)的后两个参数
widthSegments和heightSegments1
2
3
4
5
6
7
8
9
10
11
12
13
14
15
16
17
18
19
20
21
22
23
24
25
26
27
28
29
30// 3、创建物体对象
this.cubeGeometry = new THREE.BoxBufferGeometry(1, 1, 1) // 几何体
// 材质
this.material = new THREE.MeshStandardMaterial({
color: '#ffff00',
map: doorColorTexture,
alphaMap: dooralphaTexture,
transparent: true,
aoMap: doorAoTexture,
aoMapIntensity: 0.7,
displacementMap: doorHeightTexture,
displacementScale: 0.05, // 位移贴图对网格的影响程度
// opacity: 1,
side: THREE.DoubleSide
})
// this.material.side = THREE.DoubleSide // 也可以在材质对象构建完之后设置
this.cube = new THREE.Mesh(this.cubeGeometry, this.material)
this.scene.add(this.cube)
// 给cube设置第二组UV(.aoMap需要第二组UV)
this.cubeGeometry.setAttribute(
'uv2',
new THREE.BufferAttribute(this.cubeGeometry.attributes.uv.array, 2) // 使用原来的UV数组,2个值作为一个点
)
// 添加平面
const planeGeometry = new THREE.PlaneBufferGeometry(1, 1, 200, 200) // 面片、线或点几何体的有效表述。包括顶点位置,面片索引、法相量、颜色值、UV 坐标和自定义缓存属性值
const plane = new THREE.Mesh(planeGeometry, this.material)
plane.position.set(1.5, 0, 0)
this.scene.add(plane) // 添加到场景中现在也给立方体的贴图也添上突起效果,参考立方缓冲几何体(BoxGeometry)的后三个属性
widthSegments、heightSegments和depthSegments1
2// 3、创建物体对象
this.cubeGeometry = new THREE.BoxBufferGeometry(1, 1, 1, 100, 100, 100) // 几何体
完整Vue代码:
1 | <template> |
12 设置粗糙度与粗糙度贴图
材质的粗糙程度
.roughness:https://threejs.org/docs/index.html?q=mesh#api/zh/materials/MeshStandardMaterial.roughness1
2
3
4
5
6
7
8
9
10
11
12
13
14// 材质
this.material = new THREE.MeshStandardMaterial({
color: '#ffff00',
map: doorColorTexture,
alphaMap: dooralphaTexture,
transparent: true,
aoMap: doorAoTexture,
aoMapIntensity: 0.7,
displacementMap: doorHeightTexture,
displacementScale: 0.05, // 位移贴图对网格的影响程度
roughness: 0 // 粗糙度为0,光滑到反光
// opacity: 1,
// side: THREE.DoubleSide
})导入粗糙度贴图
.roughnessMap设置仅某一部分反光1
2
3
4
5
6
7
8
9
10
11
12
13
14
15
16
17
18
19
20
21
22// 导入置换贴图
const doorHeightTexture = this.textureLoader.load(require('./assets/textures/door/height.jpg'))
// 导入粗糙度贴图
const doorRoughnessTexture = this.textureLoader.load(require('./assets/textures/door/roughness.jpg'))
// 3、创建物体对象
this.cubeGeometry = new THREE.BoxBufferGeometry(1, 1, 1, 100, 100, 100) // 几何体
// 材质
this.material = new THREE.MeshStandardMaterial({
color: '#ffff00',
map: doorColorTexture,
alphaMap: dooralphaTexture,
transparent: true,
aoMap: doorAoTexture,
aoMapIntensity: 0.7,
displacementMap: doorHeightTexture,
displacementScale: 0.05, // 位移贴图对网格的影响程度
roughness: 1, // 如果还提供roughnessMap,则两个值相乘
roughnessMap: doorRoughnessTexture
// opacity: 1,
// side: THREE.DoubleSide
})
完整Vue代码:
1 | <template> |
13 设置金属度与金属贴图
材质与金属的相似度
.metalness:https://threejs.org/docs/index.html?q=mesh#api/zh/materials/MeshStandardMaterial.metalness1
2
3
4
5
6
7
8
9
10
11
12
13
14
15
16// 材质
this.material = new THREE.MeshStandardMaterial({
color: '#ffff00',
map: doorColorTexture,
alphaMap: dooralphaTexture,
transparent: true,
aoMap: doorAoTexture,
aoMapIntensity: 0.7,
displacementMap: doorHeightTexture,
displacementScale: 0.05, // 位移贴图对网格的影响程度
roughness: 1,
roughnessMap: doorRoughnessTexture,
metalness: 1
// opacity: 1,
// side: THREE.DoubleSide
})金属贴图
.metalnessMap:https://threejs.org/docs/index.html?q=mesh#api/zh/materials/MeshStandardMaterial.metalnessMap1
2
3
4
5
6
7
8
9
10
11
12
13
14
15
16
17
18
19
20
21
22
23
24
25
26// 导入置换贴图
const doorHeightTexture = this.textureLoader.load(require('./assets/textures/door/height.jpg'))
// 导入粗糙度贴图
const doorRoughnessTexture = this.textureLoader.load(require('./assets/textures/door/roughness.jpg'))
// 导入金属贴图
const doorMetalnessTexture = this.textureLoader.load(require('./assets/textures/door/metalness.jpg'))
// 3、创建物体对象
this.cubeGeometry = new THREE.BoxBufferGeometry(1, 1, 1, 100, 100, 100) // 几何体
// 材质
this.material = new THREE.MeshStandardMaterial({
color: '#ffff00',
map: doorColorTexture,
alphaMap: dooralphaTexture,
transparent: true,
aoMap: doorAoTexture,
aoMapIntensity: 0.7,
displacementMap: doorHeightTexture,
displacementScale: 0.05, // 位移贴图对网格的影响程度
roughness: 1,
roughnessMap: doorRoughnessTexture,
metalness: 1,
metalnessMap: doorMetalnessTexture
// opacity: 1,
// side: THREE.DoubleSide
})
完整Vue代码:
1 | <template> |
14 法线贴图应用
- 用于创建法线贴图的纹理
.normalMap:https://threejs.org/docs/index.html?q=mesh#api/zh/materials/MeshStandardMaterial.normalMap1
2
3
4
5
6
7
8
9
10
11
12
13
14
15
16
17
18
19
20
21
22
23
24
25
26
27
28
29// 导入置换贴图
const doorHeightTexture = this.textureLoader.load(require('./assets/textures/door/height.jpg'))
// 导入粗糙度贴图
const doorRoughnessTexture = this.textureLoader.load(require('./assets/textures/door/roughness.jpg'))
// 导入金属贴图
const doorMetalnessTexture = this.textureLoader.load(require('./assets/textures/door/metalness.jpg'))
// 导入法线贴图
const doorNormalTexture = this.textureLoader.load(require('./assets/textures/door/normal.jpg'))
// 3、创建物体对象
this.cubeGeometry = new THREE.BoxBufferGeometry(1, 1, 1, 100, 100, 100) // 几何体
// 材质
this.material = new THREE.MeshStandardMaterial({
color: '#ffff00',
map: doorColorTexture,
alphaMap: dooralphaTexture,
transparent: true,
aoMap: doorAoTexture,
aoMapIntensity: 0.7,
displacementMap: doorHeightTexture,
displacementScale: 0.05, // 位移贴图对网格的影响程度
roughness: 1,
roughnessMap: doorRoughnessTexture,
metalness: 1,
metalnessMap: doorMetalnessTexture,
normalMap: doorNormalTexture
// opacity: 1,
// side: THREE.DoubleSide
})
完整Vue代码:
1 | <template> |
15 如何获取各种类型纹理贴图
- Poliigon:https://www.poliigon.com/
- 3D Textures:https://3dtextures.me/
- arroway textures:https://www.arroway-textures.ch/
- 去注册虚幻引擎账号,由于虚幻引擎收购了Quixel Bridge,用账号登陆后可免费使用里面的素材、纹理、环境贴图。(它是个PC端软件)
16 纹理加载进度情况
纹理加载器TextureLoader:https://threejs.org/docs/index.html?q=tex#api/zh/loaders/TextureLoader
TextureLoader.load:https://threejs.org/docs/index.html?q=tex#api/zh/loaders/TextureLoader.load
1
2
3
4
5
6
7
8
9
10
11
12
13
14
15
16
17
18
19
20
21
22
23
24
25
26
27// 单张纹理图的加载进度
const event = {}
event.onLoad = function () {
console.log('图片加载完成')
}
event.onProgress = function (e) {
console.log(e)
console.log('图片加载进度')
}
event.onError = function (e) {
console.log(e)
console.log('图片加载出现错误')
}
// 导入纹理加载器
this.textureLoader = new THREE.TextureLoader()
const doorColorTexture = this.textureLoader.load(
require('./assets/textures/door/color.jpg'),
event.onLoad,
event.onProgress,
event.onError
)
const dooralphaTexture = this.textureLoader.load(require('./assets/textures/door/alpha.jpg'))
const doorAoTexture = this.textureLoader.load(
require('./assets/textures/door/ambientOcclusion.jpg')
)加载管理器LoadingManager:https://threejs.org/docs/index.html?q=load#api/zh/loaders/managers/LoadingManager
1
2
3
4
5
6
7
8
9
10
11
12
13
14
15
16
17
18
19
20
21
22
23
24
25
26
27
28
29// 单张纹理图的加载进度
const event = {}
event.onLoad = function () {
console.log('图片加载完成')
}
event.onProgress = function (e) {
console.log(e)
console.log('图片加载进度')
}
event.onError = function (e) {
console.log(e)
console.log('图片加载出现错误')
}
// 设置加载管理器
const LoadingManager = new THREE.LoadingManager(
event.onLoad,
event.onProgress,
event.onError
)
// 导入纹理加载器
this.textureLoader = new THREE.TextureLoader(LoadingManager)
const doorColorTexture = this.textureLoader.load(
require('./assets/textures/door/color.jpg')
// event.onLoad,
// event.onProgress,
// event.onError
).onProgress有三个参数:
url(被加载的项的url);itemsLoaded(目前已加载项的个数);itemsTotal总共所需要加载项的个数1
2
3
4
5
6
7
8
9
10
11
12
13
14
15// 加载进度
const event = {}
event.onLoad = function () {
console.log('图片加载完成')
}
event.onProgress = function (url, num, total) {
console.log('图片加载完成:', url)
console.log('图片加载进度:', num)
console.log('图片总数:', total)
console.log('加载进度百分比:', ((num / total) * 100).toFixed(2) + '%')
}
event.onError = function (e) {
console.log(e)
console.log('图片加载出现错误')
}添加一个简陋加载提示
1
2
3
4
5
6
7
8
9
10
11
12
13
14
15
16
17
18
19
20
21
22
23
24
25
26
27
28
29
30
31
32
33
34
35
36
37
38
39// 加载进度Dom元素简陋演示
const div = document.createElement('div')
div.style.width = '200px'
div.style.height = '200px'
div.style.position = 'fixed'
div.style.right = 0
div.style.top = 0
div.style.color = '#fff'
document.body.appendChild(div)
// 加载进度
const event = {}
event.onLoad = function () {
console.log('图片加载完成')
}
event.onProgress = function (url, num, total) {
console.log('图片加载完成:', url)
console.log('图片加载进度:', num)
console.log('图片总数:', total)
const value = ((num / total) * 100).toFixed(2) + '%'
console.log('加载进度百分比:', value)
div.innerHTML = value
}
event.onError = function (e) {
console.log(e)
console.log('图片加载出现错误')
}
// 设置加载管理器
const LoadingManager = new THREE.LoadingManager(event.onLoad, event.onProgress, event.onError)
// 导入纹理加载器
this.textureLoader = new THREE.TextureLoader(LoadingManager)
const doorColorTexture = this.textureLoader.load(
require('./assets/textures/door/color.jpg')
// event.onLoad,
// event.onProgress,
// event.onError
)
完整Vue代码:
1 | <template> |
17 详解环境贴图
相当于把周围环境的图像贴在物体表面上,当作它反射出来的环境光,这就叫环境贴图。
- cube纹理加载器CubeTextureLoader:https://threejs.org/docs/index.html?q=cube#api/zh/loaders/CubeTextureLoader
- 环境贴图
.envMap:https://threejs.org/docs/index.html?q=MeshStandardMaterial#api/zh/materials/MeshStandardMaterial.envMap1
2
3
4
5
6
7
8
9
10
11
12
13
14
15
16
17
18
19
20
21
22
23
24// 设置cube纹理加载器
const cubeTextureLoader = new THREE.CubeTextureLoader()
// 得到环境纹理贴图(Vue2需要使用require()导入图片资源)
const envMapTexture = cubeTextureLoader.load([
require('./assets/textures/environmentMaps/1/px.jpg'),
require('./assets/textures/environmentMaps/1/nx.jpg'),
require('./assets/textures/environmentMaps/1/py.jpg'),
require('./assets/textures/environmentMaps/1/ny.jpg'),
require('./assets/textures/environmentMaps/1/pz.jpg'),
require('./assets/textures/environmentMaps/1/nz.jpg')
])
// 创建物体
// 1、几何体(球缓冲几何体)
const sphereGeometry = new THREE.SphereBufferGeometry(1, 20, 20)
// 2、材质
const material = new THREE.MeshStandardMaterial({
metalness: 0.7, // 金属度
roughness: 0.1, // 光滑度
envMap: envMapTexture // 环境贴图
})
// 3、根据集合体和材质创建物体
const sphere = new THREE.Mesh(sphereGeometry, material)
this.scene.add(sphere)
完整Vue代码:
1 | <template> |
18 经纬线映射贴图与HDR
这节课让场景光亮起来
1、场景背景和场景环境贴图
Scene.background场景背景:https://threejs.org/docs/index.html?q=sc#api/zh/scenes/Scene.background
1
2
3
4
5
6
7
8
9
10
11
12
13
14
15
16
17
18
19
20
21
22
23
24
25
26
27// 设置cube纹理加载器
const cubeTextureLoader = new THREE.CubeTextureLoader()
// 得到环境纹理贴图(Vue2需要使用require()导入图片资源)
const envMapTexture = cubeTextureLoader.load([
require('./assets/textures/environmentMaps/1/px.jpg'),
require('./assets/textures/environmentMaps/1/nx.jpg'),
require('./assets/textures/environmentMaps/1/py.jpg'),
require('./assets/textures/environmentMaps/1/ny.jpg'),
require('./assets/textures/environmentMaps/1/pz.jpg'),
require('./assets/textures/environmentMaps/1/nz.jpg')
])
// 创建物体
// 1、几何体(球缓冲几何体)
const sphereGeometry = new THREE.SphereBufferGeometry(1, 20, 20)
// 2、材质
const material = new THREE.MeshStandardMaterial({
metalness: 0.7, // 金属度
roughness: 0.1, // 光滑度
envMap: envMapTexture // 环境贴图
})
// 3、根据集合体和材质创建物体
const sphere = new THREE.Mesh(sphereGeometry, material)
this.scene.add(sphere)
// 给场景添加背景
this.scene.background = envMapTexture如果去掉材质中的
envMap环境贴图,物体是不会有环境反光的:1
2
3
4
5
6
7
8
9
10
11
12
13
14
15
16
17
18
19
20
21
22
23
24
25
26
27// 设置cube纹理加载器
const cubeTextureLoader = new THREE.CubeTextureLoader()
// 得到环境纹理贴图(Vue2需要使用require()导入图片资源)
const envMapTexture = cubeTextureLoader.load([
require('./assets/textures/environmentMaps/1/px.jpg'),
require('./assets/textures/environmentMaps/1/nx.jpg'),
require('./assets/textures/environmentMaps/1/py.jpg'),
require('./assets/textures/environmentMaps/1/ny.jpg'),
require('./assets/textures/environmentMaps/1/pz.jpg'),
require('./assets/textures/environmentMaps/1/nz.jpg')
])
// 创建物体
// 1、几何体(球缓冲几何体)
const sphereGeometry = new THREE.SphereBufferGeometry(1, 20, 20)
// 2、材质
const material = new THREE.MeshStandardMaterial({
metalness: 0.7, // 金属度
roughness: 0.1 // 光滑度
// envMap: envMapTexture // 环境贴图
})
// 3、根据集合体和材质创建物体
const sphere = new THREE.Mesh(sphereGeometry, material)
this.scene.add(sphere)
// 给场景添加背景
this.scene.background = envMapTexture但是可以设置Scene.environment场景环境,该纹理贴图将会被设为场景中所有物理材质的默认环境贴图。
1
2
3
4
5
6
7
8
9
10
11
12
13
14
15
16
17
18
19
20
21
22
23
24
25
26
27
28
29// 设置cube纹理加载器
const cubeTextureLoader = new THREE.CubeTextureLoader()
// 得到环境纹理贴图(Vue2需要使用require()导入图片资源)
const envMapTexture = cubeTextureLoader.load([
require('./assets/textures/environmentMaps/1/px.jpg'),
require('./assets/textures/environmentMaps/1/nx.jpg'),
require('./assets/textures/environmentMaps/1/py.jpg'),
require('./assets/textures/environmentMaps/1/ny.jpg'),
require('./assets/textures/environmentMaps/1/pz.jpg'),
require('./assets/textures/environmentMaps/1/nz.jpg')
])
// 创建物体
// 1、几何体(球缓冲几何体)
const sphereGeometry = new THREE.SphereBufferGeometry(1, 20, 20)
// 2、材质
const material = new THREE.MeshStandardMaterial({
metalness: 0.7, // 金属度
roughness: 0.1 // 光滑度
// envMap: envMapTexture // 环境贴图
})
// 3、根据集合体和材质创建物体
const sphere = new THREE.Mesh(sphereGeometry, material)
this.scene.add(sphere)
// 给场景添加背景
this.scene.background = envMapTexture
// 给场景所有物体添加默认环境贴图
this.scene.environment = envMapTexture
2、HDR详解
HDR技术是一种改善动态对比度的技术,HDR就是高动态范围技术。
如其名字一样,HDR技术增加了亮度范围,同时提升最亮和最暗画面的对比度,从而获得更广泛的色彩范围,除了明显改善灰阶,也带来了更黑或更白的颜色效果。这样用户就可以看到更多的细节,当然前提是你放映的片源也要支持HDR技术才可以,目前市面上使用HDR录制视频的还很少。
按我的理解,说人话就是:让一张画面中最亮的部分暗下来,最暗的部分亮起来,最亮和最暗的地方都能各自看清细节。同时也因为包含很多细节,所以文件大小会比普通图片或视频也大得多。
使用HDR的素材需要用到RGBE加载器(RGBELoader)的子类,DataTextureLoader数据加载器:https://threejs.org/docs/index.html?q=data#api/zh/loaders/DataTextureLoader
1
2
3
4
5
6
7
8
9
10// 导入RGBE加载器
import { RGBELoader } from 'three/examples/jsm/loaders/RGBELoader'
// 加载hdr环境图
const rgbeLoader = new RGBELoader()
// 资源较大,设置异步加载,得到纹理
// rgbeLoader.loadAsync(require('./assets/textures/hdr/002.hdr')).then((texture) => {
rgbeLoader.loadAsync('./static/hdr/002.hdr').then((texture) => {
this.scene.background = texture
})导入
.hdr时不能使用require('./assets/textures/hdr/002.hdr')的引入方式,会报错[Vue warn]: Error in mounted hook: "Error: Module parse failed: Unexpected character '?' (1:1)You may need an appropriate loader to handle this file type, currently no loaders are configured to process this file.See https://webpack.js.org/concepts#loaders(Source code omitted for this binary file)",说明缺少解析这个文件的loader,webpack不认识。解决方法是将不想被webpack编译的静态资源文件放在public文件夹里,引用时的路径是相对于public下的index.html文件,而不是根目录下的App.vue。使用纹理映射Texture.mapping
1
2
3
4
5
6
7
8
9// 加载hdr环境图
const rgbeLoader = new RGBELoader()
// 资源较大,设置异步加载,得到纹理
rgbeLoader.loadAsync('./static/hdr/002.hdr').then((texture) => {
// 设置纹理映射(等距圆柱经纬球)
texture.mapping = THREE.EquirectangularRefractionMapping
this.scene.background = texture // 给场景设置环境纹理
this.scene.environment = texture // 给球设置环境纹理
})
完整Vue代码:
1 | <template> |
【参考内容】:
- https://threejs.org/
- 老陈打码_B站入门视频:https://www.bilibili.com/video/BV1Gg411X7FY?p=17
- 麒跃科技_老陈打码:https://www.cpengx.cn/
- 3D网格体组成原理
- web项目中不要使用指向本地的绝对路径,资源文件要么服务放在服务端,要么至少也要包含在项目路径下,用相对路径获取。否则浏览器可能会由于同源策略报没跨域的错误。还要注意在Vue2中导入图片的写法,使用
require按需导入。 - webpack官网-资源模块
- vue项目中的assets和static目录
- vue 项目引用static目录资源
- vue2.x(静态资源引入&本地&生产)
- vue如何引入本地js(打包时候不被编译的js)文件
- vue2.x 实现数据可视化大屏-可视化插件推荐
- WeChat微信打赏
- AliPay支付宝打赏